Using the right images in the right size is important for the look and performance of your website — the two things that will have the biggest impact on whether your business, blog, or portfolio is a success.
In this post, we’ll explain how WordPress generates image sizes and how to edit those sizes, and add custom image sizes for a slick, visually stunning website.

WordPress Images Formats
Before we get into discussing WordPress image sizes, it’s important to know about formats.
The two most common image formats used on online are JPEG and PNG.
Because of its smaller file size and high quality for photos and images with lots of colors, JPEG is the preferred format in the majority of cases.
PNG works better with limited color images such as icon graphics and line drawings.
Choosing the right format for your image matters because it affects the quality of the image and speed of your site.
Picking the Right Image Format
The basic rule for choosing the right format is JPEG for photos, PNG for graphics.
Nice and simple.
If your image is packed with colors and has different textures and gradients, save it as a JPEG. If it’s a logo, text or has flat colors, save it as a PNG.
What happens if you choose the wrong format?
To the naked eye, nothing much. You can save a photo as a PNG or a graphic as a JPEG and not be able to tell the difference.
It’s when compression is used that problems start to arise.
The Importance of Image Compression
Every image that you upload to your website should be compressed to reduce its overall size without affecting its quality. If it isn’t it will harm the speed of your website, which impacts user experience and causes frustrated visitors to abandon your web page.
When a user visits your site, their device has to download images so that they’re visible. The larger the file size, the longer it takes for an image file to download, slowing your entire website down.
According to Neil Patel, 47% of people expect your website to load in less than 2 seconds. And 40% will abandon it if it takes longer than 3 seconds. Speed is also important to SEO. Google uses loading times as a factor when ranking pages in its search engine. The slower the page, the poorer it will perform in search results.
Image compression finds the balance between file size and quality to improve user experience.
Now, if you compress the same photo as a JPEG and as a PNG, the quality isn’t likely to be that noticeable. You’ll maybe spot a bit of graininess up close on the PNG, but nothing that would put you off using it. However, the JPEG will be considerably smaller in size than the PNG. So you go with the JPEG.
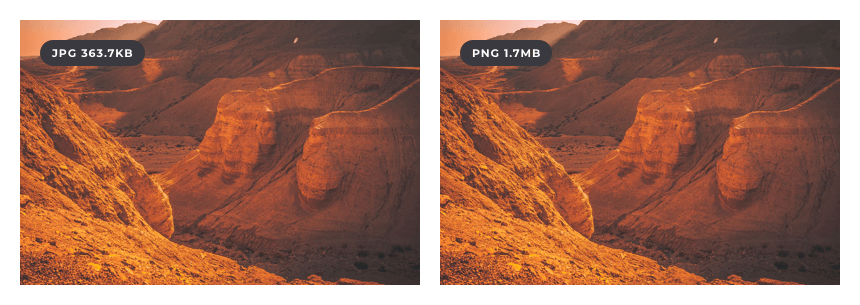
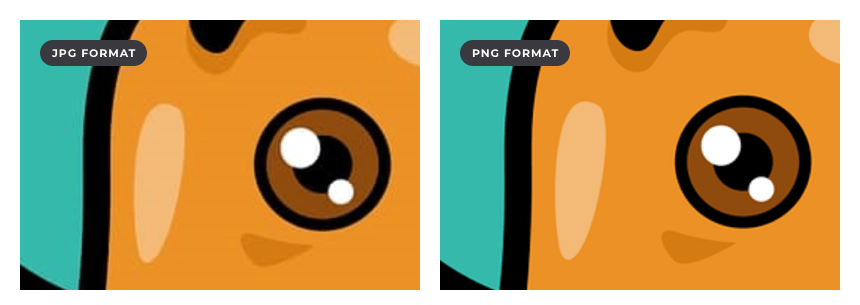
If you compress the same graphic as a JPEG and PNG, the quality is noticeable. The JPEG will be the smaller file in size, but the PNG will be the much sharper image. That’s because JPEG compression works well for photos but not for graphics. As you can see:
Compress every image. Photos as JPEGs, graphics as PNGs.
WordPress Image Sizes Explained
The size of your image in pixels is every bit as important as its file size.
Design matters as much as speed when it comes to user experience. If the image size isn’t right it will either by blurry and pixelated, throw other elements on the page out of line, or cause unnecessary sideways scrolling.
Fortunately, WordPress has a way of processing images to prevent such problems.
How WordPress Processes Images
Whenever you upload a new image, WordPress generates three additional versions of it in different sizes: thumbnail, medium, and large. Your original image remains as a full-size option.
The reason it does this is to a) to make your life easier so you don’t have to keep resizing images manually, and b) to ensure the most optimal image is available for different locations.
For example, the image used in a blog post thumbnail on your homepage will be smaller than the image needed for the blog post header.
WordPress Image Dimensions
The predetermined image sizes that WordPress uses are:
- Thumbnail size (150px square)
- Medium size (maximum 300px width and height)
- Large size (maximum 1024px width and height)
- Full size (full/original image size you uploaded)
Changing WordPress Default Image Sizes
The image sizes that WordPress creates aren’t set in stone. If the default settings don’t fit with what you need, you can easily edit the dimensions.
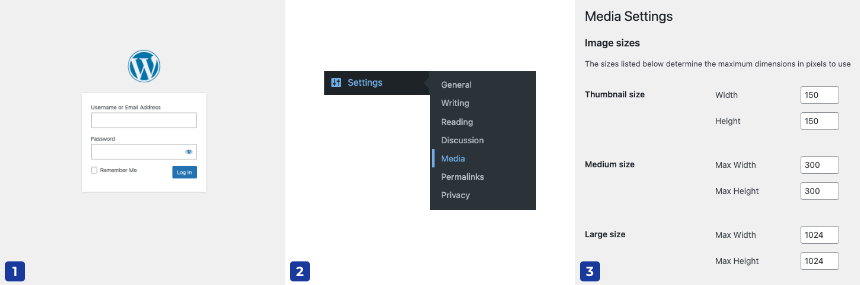
- Navigate to your WordPress admin dashboard
- Go to Settings - Media
- In Media Settings, edit the width and height dimensions to suit your values
- Click Save Changes to confirm
Changing Default Images Sizes in Visual Composer
To keep things simple, Visual Composer uses the default WordPress media image sizes in content elements that use images. Editing the default sizes from your Media Settings will also change them in the Website Builder, so you’ve no need to mess around with code.
One perk of using Visual Composer is the smart image optimization functionality. If you customize your image to a random size, Visual Composer will resize it using PHP instead of just downscaling it. This helps you keep your file sizes smaller.
Background images that aren’t related to content elements like feature descriptions can be edited in Design Options. From here, you customize your image, upload multiple images, choose different background types, and reposition an image to suit your design. Check out this guide on how to move a background image.
The fact that our themes are responsive means that the image sizes you do choose will automatically resize to suit the device being used to view your website. You can instantly check your site layout on the most popular device types in desktop, tablet landscape, and portrait, and mobile landscape and portrait so you don’t need to worry about running into design issues when your site is live.
Recommended Image Sizes for WordPress Content
If you decide that the image sizes WordPress automatically generates when uploading new media don’t fit with what you need, here are some recommended sizes for content to look at its best on any device.
- Blog posts: 1200 x 630px
- Hero images (full screen images): 2880 x 1500px
- Landscape feature image: 900 x 1200px
- Portrait feature image: 1200 x 900
- Fullscreen slideshow: 2800 x 1500px
- Gallery images: 1500px x auto width
Adding Custom WordPress Image Sizes
The three default WordPress image sizes will cover you in most situations, but what happens if you need custom images for, say, a new widget you’ve added to your site?
In this case, you’ll need to add your own custom image sizes, which means editing the code of your site.
Note: Whenever you’re editing the code of your website, create a backup file and child theme first.
You can add custom image sizes to your website’s code in two steps.
Step 1
- From your WordPress dashboard, go to Appearance - Editor and edit the functions.php file.
- Copy the following code and paste it into the file.
add_theme_support( 'your-image');
Replace ‘your-image’ with whatever custom image you want to add. For example, ‘post-thumbnails’ or ‘pop-up-banners’
- Click Save and the add_image-size () function will be enabled.
- Add your custom images and sizes using this format:
add_image_size( 'post-thumbnail size', 800, 350 );
You can change ‘post-thumbnail’ to whichever image you want to add. The numbers 800 and 350 in this example are the height and the width of your image respectively. Edit them to suit.
Step 2
Once you’ve added the new image sizes, the next step is to get them to display in your theme. This involves adding some code to the post loop where you want to show your file.
Copy and paste the following code into your theme file before the end of the loop:
the_post_thumbnail( 'your-image-size' );
Replace ‘your-image-size’ for your image — e.g. ‘post-thumbnail-size’. When that’s done, you’ll see your image size listed as an option when you upload new images to your media library.
Step 3
Unfortunately, the addition of the code doesn’t alter existing images. To update those so that they match your new dimensions, you’ll need help from a plugin. And WordPress certainly has no shortage of those.
The best one for this job is Regenerate Thumbnails. It’s free and takes care of all the heavy lifting.
- From your WordPress dashboard go to Plugins - Add New and search for ‘Regenerate Thumbnails’. The one you’re looking for is by Alex Mills.
- Install and activate the plugin
- Go to Tools - Regen. Thumbnails and click Regenerate Thumbnails
That’s it. All of your existing images will be automatically resized to match newly uploaded ones.
WordPress Image Size Plugins
As Visual Composer is a plugin that you add to WordPress to design a custom website, you’re free to install other plugins to run alongside it. Just like you would if you were using a default WordPress theme.
We’ve already spoken about Regenerate Thumbnails, but here are some we’d recommend for compressing images to improve site speed and performance.
- Imagify by WP Rocket offer three levels of image compression — Normal, Aggressive, and Ultra — to reduce the size of images without losing quality (Aggressive offers the best balance of compression and quality). It also lets you store original images in a separate folder — handy if anything goes wrong.
- ShortPixel is a simple to use plugin that lets you compress images with minimum fuss. If you’re a photographer or use high-quality imagery for your products or services, the plugin’s glossy feature delivers compression with no risk of compromising quality.
- Resize Image After Upload is made by the team behind ShortPixel and designed to let you easily change image sizes for uploaded media. You can set the height and width to suit and choose to compress the image at the same time. The plugin only works on newly uploaded images, but it can save time going back and forth to the WordPress settings.
- Compress JPEG & PNG Images by TinyPNG (one of the best web tools for image compression) is simple to use and ready to go out of the box. You can upload images for compression individually or set the plugin to automatically compress, so you don’t have to worry about large files making their way onto your site.
- Imsanity by Exactly WWW automatically resizes bulk image uploads so that they’re at the optimal size for a browser. You can select sizes for images uploaded to pages and posts, images uploaded to the Media Library, and images uploaded to headers, backgrounds, logos, and widgets. You can also convert images from BMP and PNG to JPEG and select image quality settings. If you rely heavily on media and upload multiple images a week, Imsanity will save you a ton of time.
Wrap Up
For most tasks in building and editing your website, WordPress default image sizes will meet your needs. If the design of your site requires different image sizes, use the info in this post to change the dimensions in Media Settings and your site’s code. Regardless of image size or how many times you edit settings, Visual Composer will work seamlessly with your choices, allowing you to easily drag-and-drop images into your content.

Hi, I need some explanation regarding the images. I have a dilemma either they too large either too ugly. I do photos and promote my business through two pages https://momentstopper.com and https://afoto4u.com/ and managing images makes me nuts. I use WordPress and Elementor.
GT Metrix and Nibbler give me bad evaluations for my image optimization. Can someone tell me what I do wrong?
– After uploading an image (that is pretty large) to my page I inspect what the browser is showing. I see the original dimensions of the file and the dimensions that are used to show the image on the browser.
– From here, it seems that I could go back to WordPress dashboard and edit the resolution using ‘custom’ or if there are more of the same I could go to settings/media/ and enter the size to of the image that I found in the browser.
– But both these methods are not producing desired results. As soon as I reduce the resolution images to the one find it the browser during the inspection images turns into a c**p.
– Let’s take an example I upload image 768×513 it looks nice. I inspect what my browser shows: 376×257. I go back to WordPress and enter ‘Custom’ – 376x257to image settings and it looks pathetic.
– It seems that for images to look nice they have to be bigger than the browser is reporting … What am I doing wrong?
Thank you!
Hi, tailoring an image for your browser or screen-size is not an option. Different people have different screen-sizes and resolutions so this just won’t work. I am not familiar with how it works on alternative editors, but in Visual Composer, you just insert the image and specify the largest size – everything else is done for you – image just gets scaled down to the size of the screen (yours, your visitors, etc.). Also, my recommendation would be to use kraken.io to optimize image size before uploading it to your WordPress Media Library.
No code is visible in Step 2.
Hey there, I have a client trying to use my photos on their website that is powered by wordpress. They are JPEG files, but for some reason they are not able to download to her website. What would be causing this? all the photos are exported at 2500PPI and are around 15MB each. Are they too big?
My site is having the same problem. Earlier the photos were visible on live wordpress site. Now it always shows an unexpected error. I have tried different image sizes, but nothing is working for me.
You can use wp_get_attachment_image( ‘id-of-your-image’, ‘your-custom-size’ ) but image size apply for most functions returning img.
Hi, first of all thank you for hosting an up to date blog unlike many of your contemporaries. I have been uploading images on my wife’s professionally built website for a couple of years and have up until now sized and cropped them to the size of the window/canvas on the page before uploading to the Media Library. This has been very time consuming. I am now about to embark on building my first site from the ground up so I want to get this right. I have since learned that WordPress creates 3 images from the original anyway so it looks like I have been wasting a lot of my time previously. Can you recommend a size I should upload, whether I should do any optimisation first, should it already be cropped or left to Visual Composer/ WPbakery which I am now using to tidy up. As a newbie i confess to being confused about file size, resolution etc.
Hi – my full size of actual image is 290 x 305.
When i select full size when creating image gallery with row of 4 images they get stretched out beyond size I made them to 340 x smth
Ideas as to how wp respects the actual size u upload?
I select “full size” and they get stretched and altering dimensions thru media in settings won’t work. So say I set medium dimensions to 290 x 305, images still get stretched beyond original dimensions :/
Tks
Robert, it depends on where you’re inserting them – in some cases, images take the space reserved for them and get stretched. You should either resize your images or consider different layout type that fits your desired image sizes.
My site is becoming really slow and I know it’s because of the images sizes I uploaded to my media library and on my website. My question is, What is the best way for me to swap out the large images for smaller ones? I have a plug in to compress images but I’m thinking the file sizes are way too big to begin with and I’m thinking I have to start over with each image and replace with a smaller one. Do I, or can I, delete the images in the library after I replace them with a smaller sized images for every image on my site or is there an easier way?
Thank you, Lori
Hey Lori – I’ve been on a quest to fix this across a couple different blogs, and come up with a better process for the future as well. In my experience:
Plugins are a mess, take a while, don’t have the batch capacity you’re probably looking for (unless you’re willing to pay). I’ve tried 10s of different image compression/optimization plugins and am never happy with the result. I would recommend downloading your library and doing a bulk resize and compression before re-uploading. Here is what I typically do, and it’s been working out well. Hopefully I can automate this a little bit further in the near future.
– Come up with some basic standards for images on my blog. I’ve decided someting along the the lines of 1024 width for high-res retina screens and about 50% of those dimensions for standard screens when it comes to blog posts. Thumbnails, etc. As he mentioned you can change those sizes.
– Use photoshop or another image editing program to reduce images to those sizes, and then save as a JPEG or PNG, also reducing the quality when you go to save it. Photoshop has a 1-12 scale for JPEGs, and the size difference is pretty drastic. I use 6, 7 or 8 depending on the image, and see it takes the file size down 30-40%.
– After saving, I batch compress using TinyPng.com. This tool usually saves another 30-60%. Most images are in the 30-60kbs range with minimal loss in quality. I honestly don’t know how much smaller I can make them without degrading the image to the point where it becomes no longer useful to my readers.
WordPress v.5.3 introduced new large resized image sizes to generate more suitable srcset attributes for large images.
The new image sizes proportionally resize the original images to
– medium_large – 768 × 0
– 1536*1536
– 2048* 2048
– 2560* 2560
Photo Canvas Collage prints are the ideal way to display lots of your stunning images without buying masses of bulky picture frames or cluttering up the house. With the use of smartphones and readily available digital cameras, we have become a nation of amateur photographers, using Instagram to capture our favourite moments. Out of this we now have some incredible photographs we are sure to treasure forever; the problem is there are just too many of them, making the task almost impossible when
choosing images to display in our homes
Dose add_image_size support cropping WebP image extension?
Thanks
Hi there, thanks for video
I’m still unsure about the following: If I change the sizes on my media library – settings like you showed, will it automatically change the existing images on my WordPress website, I assume not?
On Destinations on my travel blog, the ‘future images’ aren’t all the same sizes, and it looks crappy. I’m not sure how to get them all the same size as when I try to resize them, on the library won’t they change the format for the same image elsewhere on my site? For example, I have the same image appearing as a large image on one Post, and I want to use the same image as a ‘future image.’ Is 500×500 the best for future ‘image’ so that they appear neatly where a list of all the posts appears?
http://www.adventuretravelcoach.com
Very informative, thank you! Just one question, “Gallery images: 1500px x auto width”, does this mean I will set the HEIGHT to 1500 and let the width follow via auto?
I’m on the fence about this, while more customization is good, I have a feeling this is a “in-progress” update, it just feels incomplete and half-way there.
We use badge layout for apps on design approvals (visual projects), so the image being displayed is important. Old layout “feels like” it had larger images,
maybe because the images were cropped more loosely so it’s easier to tell which project it was at quick glance. Now the image is cropped closer, making it
harder to scan thru at quick glance. I find myself needing to click into the project more often than usual. Which makes the whole user experience less
efficient.
I have a couple suggestions that might make it work better:
1. Increase the height of the window the cover image is being displayed.
2. Let us to choose which image to be displayed as “cover” (like how Pinterest handles cover images of each board, was hoping for this for a long time)
3. Let us adjust which part of the image to show and how tight or loose the crop is (with a fixed window, let us move the image around and maybe enlarge or
shrink it to control what shows thru the window. Pinterest does a limited form of this, which is very useful in making the cover image relevant)
4. Allow Cover Image to be ordered in different hierarchy (currently every element can be ordered differently except the Cover Image, it seems to be stuck
in the 2nd spot, would like the option to set it on another spot in the layout. This one seems like an easy fix, since you guys allow that for every other
element already)
I have been surfing online more than three hours lately, but I never found any attention-grabbing article like yours. It is lovely price sufficient for me. In my view, if all website owners and bloggers made excellent content as you did, the net might be much more useful than ever before. mescio.goodprizwomen.com/relaxation/fly-trondheim-lesund.php fly trondheim alesund
I have a two part question.
What if we have a photo, but have placed text on top of it? Should it be PNG or JPEG?
Also, I uploaded my photo to WordPress at 1,000 wide x 600 high, but when I look at it in the blog post on my computer screen it is 641 x 387. I know different screen sizes are going to show the image differently, but the screen is plenty large enough to show it at the original size.
I did this so that the blog image would be the same width as the blog text, but it is not. The text is much smaller.
Any help is appreciated.
What about working with images, such as the logo, in mobile view with @media and including a favicon image?
It’s hard to take an article quoting Neil Patel very seriously.
I did not find the sizing recommended for WordPress blog posts to be correct. I used it to download a picture and when I uploaded it onto my WP site it’s not properly sized for the space. The edges of the sides of the picture are cut off.
hi, a quik question.
What is the size of the image at preview in media Gallery. I mean when i open the media gallery to choose a photo, the size that i see (small thumbnails) are they 150X150 ?
Thank you
easy to understand. Very clear. Helped me 100%. Thank you.
yyhqxywnsapwehnemujpfnxpyxwmlz